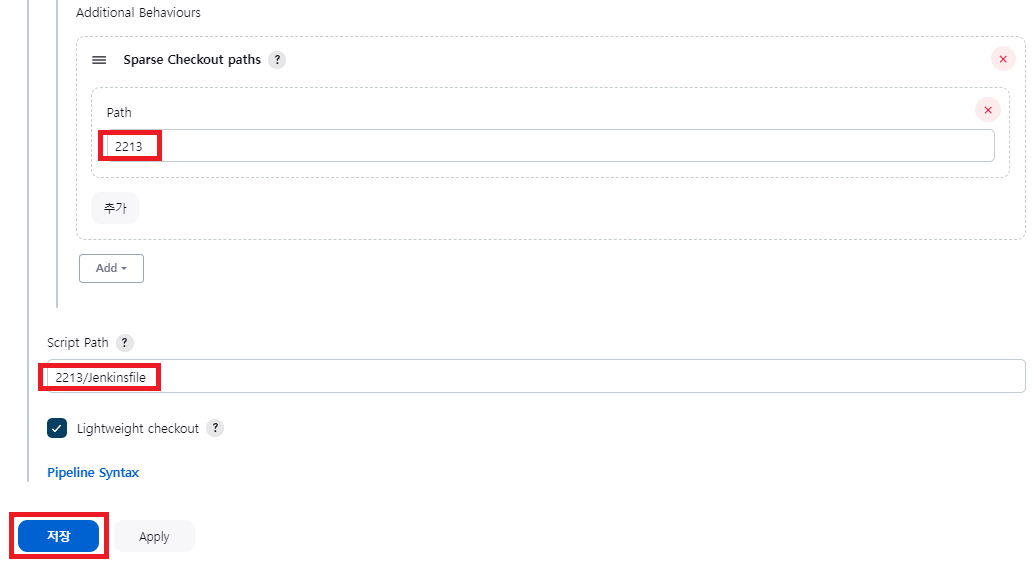
Path : 2213
Script Path : 2213/Jenkinsfile
> 배포전략을 세울 때 고려해야 하는 요소
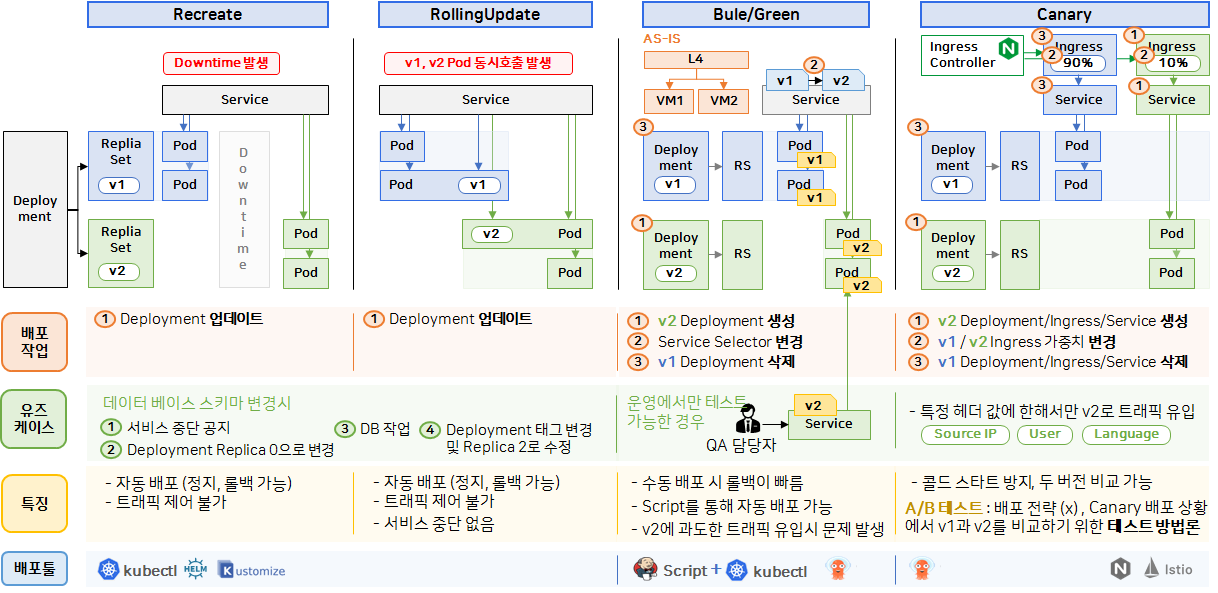
> 단계별로 배포파이프 라인 구축

> 기초부터 Blue/Green까지 배포 구축 단계

1. Jenkins Pipeline 기본 구성 만들기 - Step 1
* 사전 조건
- docker hub 계정
- github 계정
- github에 2개 repo fork 필수
ㄴ kubernetes-anotherclass-sprint2
ㄴ kubernetes-anotherclass-api-tester
- New View를 만든 후(221) pipeline 생성
2211-jenkins_pipeline-step1


- Script 복사

*주의: 아래 pipeline script에서 DOCKERHUB_USERNAME 과 GITHUB_URL에 본인의 계정정보 입력
deployment.yaml 에도 image 부분에 본인 dockerhub으로 변경
image : 1pro/api-tester:v1.0.0 => image : vicljc/api-tester:v1.0.0
pipeline {
    agent any

    tools {
        gradle 'gradle-7.6.1'
        jdk 'jdk-17'
    }

    environment {
        // 본인의 username으로 하실 분은 수정해주세요.
        DOCKERHUB_USERNAME = '1pro'
        GITHUB_URL = 'https://github.com/k8s-1pro/kubernetes-anotherclass-sprint2.git'
        // deployment.yaml -> image: 1pro/api-tester:v1.0.0

        // 실습 넘버링 - (수정x)
        CLASS_NUM = '2211'
    }

    stages {
        stage('Source Build') {
            steps {
                // 소스파일 체크아웃
                git branch: 'main', url: 'https://github.com/k8s-1pro/kubernetes-anotherclass-api-tester.git'

                // 소스 빌드
                // 755권한 필요 (윈도우에서 Git으로 소스 업로드시 권한은 644)
                sh "chmod +x ./gradlew"
                sh "gradle clean build"
            }
        }

        stage('Container Build') {
            steps {
                // 릴리즈파일 체크아웃
                checkout scmGit(branches: [[name: '*/main']],
                    extensions: [[$class: 'SparseCheckoutPaths',
                    sparseCheckoutPaths: [[path: "/${CLASS_NUM}"]]]],
                    userRemoteConfigs: [[url: "${GITHUB_URL}"]])

                // jar 파일 복사
                sh "cp ./build/libs/app-0.0.1-SNAPSHOT.jar ./${CLASS_NUM}/build/docker/app-0.0.1-SNAPSHOT.jar"

                // 컨테이너 빌드 및 업로드
                sh "docker build -t ${DOCKERHUB_USERNAME}/api-tester:v1.0.0 ./${CLASS_NUM}/build/docker"
                script{
                    if (DOCKERHUB_USERNAME == "1pro") {
                        echo "docker push ${DOCKERHUB_USERNAME}/api-tester:v1.0.0"
                    } else {
                        sh "docker push ${DOCKERHUB_USERNAME}/api-tester:v1.0.0"
                    }
                }
            }
        }

        stage('K8S Deploy') {
            steps {
                // 쿠버네티스 배포
                sh "kubectl apply -f ./${CLASS_NUM}/deploy/k8s/namespace.yaml"
				sh "kubectl apply -f ./${CLASS_NUM}/deploy/k8s/configmap.yaml"
				sh "kubectl apply -f ./${CLASS_NUM}/deploy/k8s/secret.yaml"
				sh "kubectl apply -f ./${CLASS_NUM}/deploy/k8s/service.yaml"
				sh "kubectl apply -f ./${CLASS_NUM}/deploy/k8s/deployment.yaml"
            }
        }
    }
}
- 지금 빌드 실행 후 결과 확인

- Jenkins Pipeline 구조

Agent
- agent any : 사용 가능한 에이전트에서 파이프라인 Stage를 실행, Master나 Salve 아무곳에서나 Stage가 실행됨
- agent label(node) : 지정된 레이블(노드)에서 Stage가 실행
- agent docker : Docker 빌드를 제공해주는 Agent 사용
- agent dockerfile : Dockerfile 을 직접 쓸 수 있는 Agent 사용


Jenkins Docs : https://www.jenkins.io/doc/book/pipeline/syntax/
2. Github 연결 및 파이프라인 세분화(Jenkinsfile) - Step 2
- pipeline 생성
2212-jenkins_pipeline-step2
- Configure > General > GitHub project에 Project url 입력 (본인 github 계정 입력)
Project url : https://github.com/[본인 github 계정]/kubernetes-anotherclass-sprint2/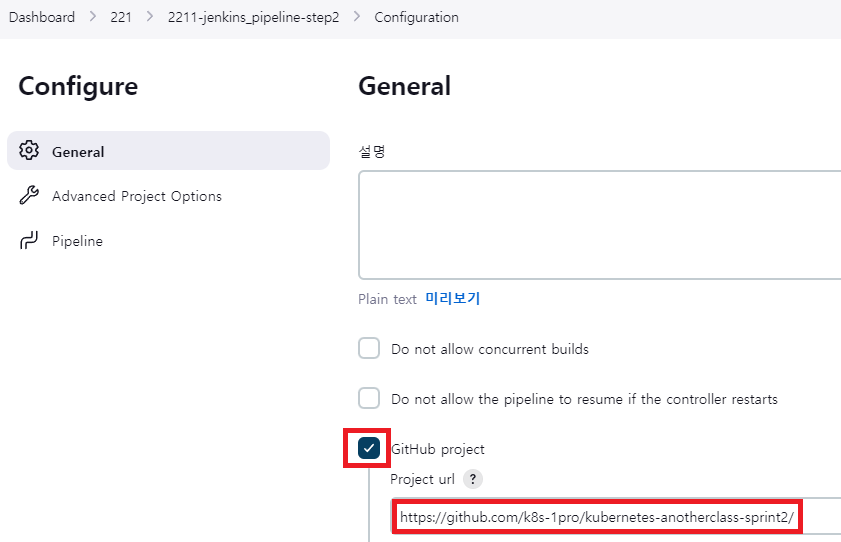
- Configure > Advanced Project Options > Pipeline (2/2)
Branch Specifier : */main
Path : 2212
Script Path : 2212/Jenkinsfile
- 저장 후 지금 빌드 실행

- 실습 후 다음 단계를 위해 정리
kubectl delete ns anotherclass-221
3. Blue/Green 배포 만들기 - Step 3
- pipeline 복사 생성
Enter an item name : 2213-jenkins_pipeline-step3
Copy from : 2212-jenkins_pipeline-step2
- Configure > Additional Behaviours 및 Script Path 수정 후 저장
- Master Node에서 version 조회 시작
[root@k8s-master ~]# while true; do curl http://192.168.56.30:32213/version; sleep 1; echo ''; done;
- 지금 빌드 실행 후 수동배소 시작 yes 클릭(Green 배포)

- V2 서비스 호출 가능 : Green 배포 한 버전인 V2를 미리 테스트 해본다는 의미
curl http://192.168.56.30:32223/version
- Green 전환 yes 클릭 및 v2로 버전 변경 확인
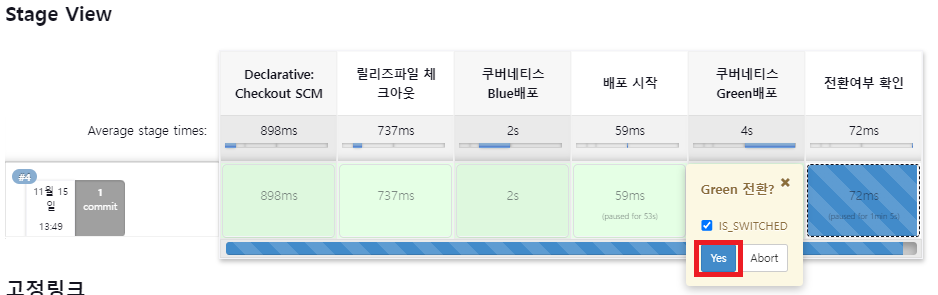
- Rollback 여부 선택

- done : Blue 배포 삭제됨
- rollback : Blue로 다시 전환됨
> Blue/Green 배포시 필요한 요소

1. Blue-Green 배포를 고려한 Deployment 네이밍 필요
2. Blue-Green 배포를 위한 추가 레이블 및 셀렉터 필요
> 리소스 변경 사항 리뷰

1. Green Deployment 생성 (네이밍, version, blue-green-no 고려), 테스트를 위한 Service 생성, QA 담당자 테스트 실시
2. Service의 Selector (blue-green-no)를 2로 변경하여 트래픽 Green으로 전환
3. Blue Deployment, Green Service 삭제 및 관련 모든 리소스의 레이블 정보 변경 (version) or Rollback
- 실습 후 다음 단계를 위해 정리
kubectl delete ns anotherclass-221
4. Blue/Green 자동 배포 $cript 만들기 - Step 4
- pipeline 복사 생성
Enter an item name : 2214-jenkins_pipeline-step4
Copy from : 2213-jenkins_pipeline-step3
- Configure > Additional Behaviours 및 Script Path 수정 후 저장
Path : 2214
Script Path : 2214/Jenkinsfile
- Master Node에서 version 조회 시작
while true; do curl http://192.168.56.30:32214/version; sleep 1; echo ''; done;
- 지금 빌드 실행 후 자동배포 시작 yes 클릭


> 리소스 변경사항 리뷰

1. Green Deployment 생성 (네이밍, version, blue-green-no 고려)
2. Green Pod에서 Ready 상태 확인
3. Service의 Selector (blue-green-no)를 2로 변경하여 트래픽 Green으로 전환
4. Blue Deployment 삭제 및 관련 모든 리소스의 레이블 정보 변경 (version)
- Green 이 ready 인지 확인 하는 작업
아래 script 처럼 green pod를 조회하여, container 상태가 rady인지를 판단한 후(ready 이면 "true"를 반환, pod가 2개이기 때문에 "true true"를 반환) green으로 전환
stage('Green 배포 확인중') {
            steps {
                script {
                    def returnValue
                    while (returnValue != "true true"){
                        returnValue = sh(returnStdout: true, encoding: 'UTF-8', script: "kubectl get -n anotherclass-221 pods -l instance='api-tester-2214',blue-green-no='2' -o jsonpath='{.items[*].status.containerStatuses[*].ready}'")
                        echo "${returnValue}"
                        sleep 5
                    }
                }
            }
        }
- 실습 후 다음 단계를 위해 정리
kubectl delete ns anotherclass-221
'Container > Kubernetes' 카테고리의 다른 글
| [ Kubernetes ] Helm과 Kustomize 비교하며 사용하기 - Kustomize 배포 (1) | 2024.07.22 |
|---|---|
| [ Kubernetes ] Helm과 Kustomize 비교하며 사용하기 - Helm 배포 (0) | 2024.07.17 |
| [Kubernetes] 데브옵스 환경 구축 (0) | 2024.06.24 |
| [Kubernetes] Component 동작으로 이해하기 (2) | 2024.06.07 |
| [Kubernetes] Application 기능으로 이해하기 - HPA (1) | 2024.06.05 |


